
Update (November 2026): this tutorial was written in 2016. In recent WooCommerce versions, attribute terms no longer offer a “Parent” field by default; Bulk Attributes for WooCommerce lets you enable attribute hierarchy again from the WordPress admin.
WooCommerce Attributes… Ah, our lovely attributes…
As defined by their makers, the WooThemes people, now Automattic people, WooCommerce® attributes are little pieces of data that you can add to your WooCommerce shop, then assign to your WooCommerce products. Their role is to help your users, let’s say your customers, easily search or refine your online shop catalog while browsing and searching for a product on your site.
Creating an attribute set is very simple: you create them just as you create a WordPress post category. Let’s dive deep into attributes and understand how, when nested with hierarchy support, they can give us some nice benefits, especially for our customers browsing our online shops!
The scenario
Let’s consider an online shop that lists cell phone unlocking services. That store’s WooCommerce products are considered as “unlocking tools”. The store owner has created different tools that deliver cell phone unlock codes to customers instantly online.
In fact, they have servers behind them handling the cell phone unlocking algorithm and generating genuine factory unlock codes for each request….. Anyway, let’s get back to our subject of the day: adding WooCommerce attributes to an online WooCommerce shop.
So each product, or tool, supports unlocking some specific cell phone models and brands, but also phones locked to some specific carriers.
Here are some sample tools or product characteristics needed. Those characteristics will be registered in WooCommerce as attributes:
- Product name: Unlock Samsung UK
- Supported brands: Samsung
- Supported phone models: Samsung Galaxy S4, Samsung Galaxy S5, Samsung Galaxy S6, Samsung Galaxy S6 Edge, Samsung Galaxy S7, Samsung Galaxy S7 Edge, Samsung Galaxy A5, etc., etc… The Samsung phone models list has over two hundred devices
- Supported country: United Kingdom
- Supported carriers: Everything Everywhere UK, Orange UK, O2 UK, Tesco Mobile UK, Virgin Mobile UK, Vodafone UK, 3 Hutchison UK
After spending some time analysing the need, we ended up setting up WooCommerce attributes and terms like these to support the specific needs of this shop:
- First attribute: Brands & Models
- First-level terms will be the brand names
- Second-level terms will be the phone models available under each brand
- First-level terms will be the brand names
- Second attribute: Countries & Carriers
- First-level terms will be the countries
- Second-level terms will be the GSM carriers in each country
- First-level terms will be the countries
Creating our Attributes
Here are the steps to create our attributes.
- Head to Products > Attributes. It opens with the “Add New Attribute” form displayed.
Fill in the form with the attribute needed, in our case Brands & Models, then click the “Add Attribute” button.
 While creating it, you can choose the attribute’s type and its sort order. Note that you can give this a try and adjust it later on, as these values can be updated after the initial setup.
- Repeat that step to add the second attribute needed, in our case Countries & Carriers.
 Attributes” width=”598″ height=”674″ />
- That’s all for manually creating your attributes.
Let’s organize our attributes and terms with hierarchy support
So now that our attributes are ready to receive data, the next job is to insert the data. In our case, you noticed that we created only 2 attributes… Why? This is because, in our case, it was interesting to make use of attribute hierarchy support in WooCommerce. We could have created 4 attributes, like:
- Brands
- Models
- Countries
- Carriers
to hold the data of our products….. But we rather decided to do it like this:
- Brands & Models
- Countries & Carriers
So let’s bring back our sample input data; this sample data is for the product “Unlock Samsung UK”.
Sample Attributes Organisation Model
- Supported brands: Samsung
- Supported phone models: Samsung Galaxy S4, Samsung Galaxy S5, Samsung Galaxy S6, Samsung Galaxy S6 Edge, Samsung Galaxy S7, Samsung Galaxy S7 Edge, Samsung Galaxy A5, etc., etc… The Samsung phone models list has over two hundred devices
- Supported country: United Kingdom
- Supported carriers: Everything Everywhere UK, Orange UK, O2 UK, Tesco Mobile UK, Virgin Mobile UK, Vodafone UK, 3 Hutchison UK
So our data will be inserted like this (explained previously, but let’s repeat it…). In fact, these attribute terms will represent the brand names and models supported by, or compatible with, each accessory or tool. So we have:
- Attribute name: Brands & Models.
This attribute will contain attribute terms that will be the real cell phone brands and models.- Under this attribute, we will add first-level terms that will be brands, like Samsung, LG, HTC, etc…
With these first-level attribute terms created, we have what we call “parent attribute terms”. We can now add child attribute terms below them.- So under each parent attribute term, we will add phone model names as child attribute terms. For example, for Samsung, we will have as child attribute terms (under the parent attribute term Samsung) models like: Samsung Galaxy S4, Samsung Galaxy S5, Samsung Galaxy S6, Samsung Galaxy S6 Edge, Samsung Galaxy S7, Samsung Galaxy S7 Edge, etc…..
- Under this attribute, we will add first-level terms that will be brands, like Samsung, LG, HTC, etc…
- Attribute name: Countries & Carriers
This attribute will contain terms that correspond to countries (as first-level terms), and each country’s GSM carriers or operators will be second-level terms under each first-level term:- USA
- AT&T USA
- T-Mobile USA
- Metro PCS
- Cricket USA
- Spain
- Orange Spain
- Vodafone Spain
- Movistar Spain
- Yoigo Spain
- USA
Adding the attribute terms manually in WooCommerce with hierarchy
Adding new attribute terms is done from Products > Attributes.

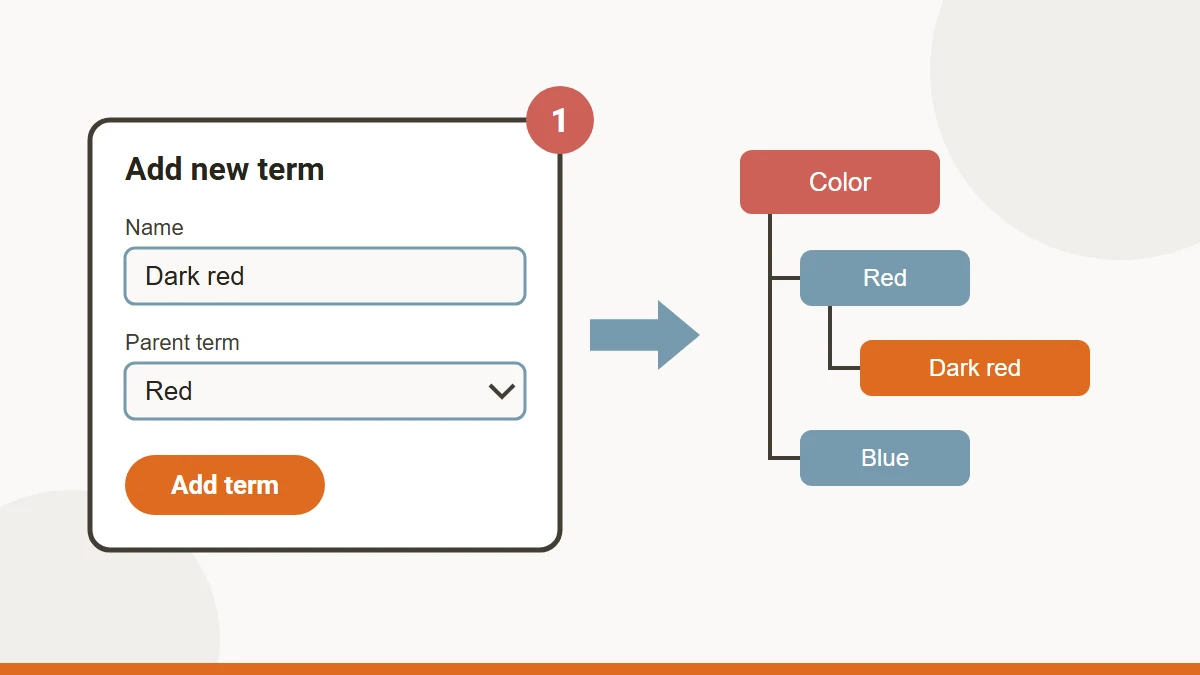
- So let’s add the brand as a first-level term (go to Products > Attributes), then click on the attribute name, in our case “Brands & Models”.
- Insert the name of the attribute term you would like to have at the first level; in our case, the first brand is Samsung.

- Now let’s add the phone models as second-level attribute terms; they will be under the previously created parent, Samsung.

Note that we have selected the parent attribute term in the Parent field, in our case Samsung….
The result of adding this is:

- We will need to repeat this task as many times as the number of attribute terms we need in our shop structure…. For this example, Samsung has over 200 phone devices available…. Try estimating how long it would take to add them like this!
- Insert the name of the attribute term you would like to have at the first level; in our case, the first brand is Samsung.
- We will have to repeat the same process to add the supported countries and supported carriers as well. If you understood the classic process, you should be able to organize your attribute data like our sample:


That’s all for manually adding WooCommerce attributes to your store….. Time-consuming, huh?? We will show you in our next post how to do this easily and save your day!!